NEST Pensions
You should use this guide after registering and setting up your pension scheme with NEST. If you have not yet set up your scheme with NEST then please refer to our guide Setting the ‘Payment frequency’ and ‘Earnings period’ on the NEST website first, which has been designed to help with part of the NEST setup procedure.
This guide is specifically designed to show how Payroll Manager can help with the Auto-enrolment process and is split into 6 sections. It is very important that you go through the setup procedure correctly in order to avoid problems later.
- 1. Employer Details setup and adjustments
- 2. Adding the details of your NEST pension Scheme
- 3. Assessing the workforce.
- 4. Adding Employees and setting contributions.
- 5. Sending letters to employees
- 6. Uploading information to NEST
1- Employer Details setup and adjustments
Click ‘Employer’ from the main menu, then ‘Employer Details’, then click on the ‘Auto-Enrolment pensions’ tab.
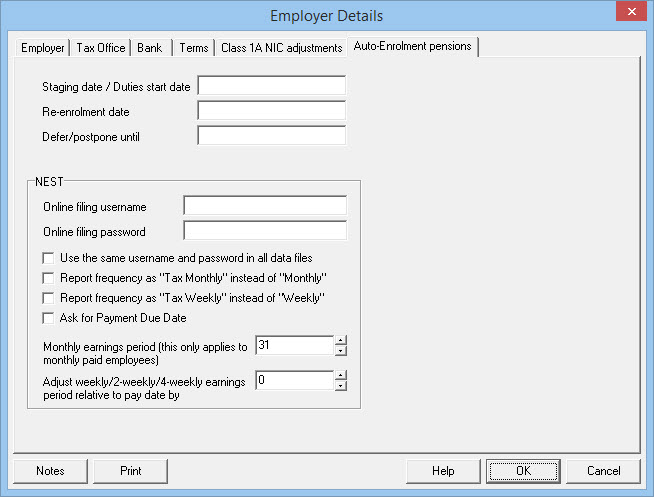
- Staging/ Duties Start Date – Each employer has a date from when the automatic enrolment duties come into force for their business. This is called the ‘duties start date’ and is the date that they take on their first employee(s)
- Re-enrolment date – Leave this field blank at this stage. (Re-enrolment relates to the automatic enrolment of workers who may have opted out of your pension scheme, and does not take place until 3 years following your staging/duty start date).
- Defer/postpone until – If you are using postponement to postpone automatic enrolment for all of your employees from your staging/duty start date then enter the relevant date in this box, otherwise leave this field blank.
- Online filing username – Enter your NEST Username. NEST have a number of different services, so it is very important that you enter exactly the same ‘Username’ that you use to log onto the NEST website.
- Online filing password – Enter your NEST Password. NEST have a number of different services, so it is very important that you enter exactly the same ‘Password’ that you use to log onto the NEST website.
- Use the same username and password in all data files – if you are a payroll agent and wish to use the same ‘delegate’ NEST username and password in all client files then tick this box.
The remaining boxes on this screen have been added in order to match the output generated by Payroll Manager with that expected by NEST when uploading contribution information. You may find that you need to make some initial adjustments on this screen depending on how your NEST scheme has been set up.
- Report frequency as “Tax Monthly” instead of “Monthly” – (N.B If you don’t have any monthly paid employees then you can ignore this box). As part of the initial setup procedure on the NEST website you would have been asked to specify the payment frequency of your employees. For monthly paid employees, NEST (confusingly) allows you to choose either ‘Monthly’ or ‘Tax Monthly’ as the payment frequency. You should log on to the NEST website and go to the ‘Manage Contributions’ section to see which pay frequency you have specified. If the Payment frequency column on the NEST website shows ‘Monthly’ (as in the example below), then you should leave this box in Payroll Manager unticked. If the NEST website shows a Payment frequency of ‘Tax Monthly’ then you need to tick this box in Payroll Manager. This setting has no effect on payroll calculations, but does help to ensure that communications with NEST are successful.

- Report frequency as “Tax Weekly” instead of “Weekly” – (N.B If you don’t have any weekly paid employees then you can ignore this box). As part of the initial setup procedure on the NEST website you would have been asked to specify the payment frequency of your employees. For weekly paid employees, NEST (confusingly) allows you to choose either ‘Weekly’ or ‘Tax Weekly’ as the payment frequency. You should log on to the NEST website and go to the ‘Manage Contributions’ section to see which pay frequency you have specified. If the Payment frequency column on the NEST website shows ‘Weekly’ (as in the example below) then you should leave this box in Payroll Manager unticked. If the NEST website shows a Payment frequency of ‘Tax Weekly’ then you need to tick this box in Payroll Manager. This setting has no effect on payroll calculations, but does help to ensure that communications with NEST are successful.

- Ask for Payment Due Date – leave this box unticked. NEST previously asked that you report this information but have recently updated their systems so that it is no longer required.
- Monthly earnings period – As part of the initial setup procedure on the NEST website you would have been asked to specify what NEST refer to as the ‘earnings period end date’ for monthly paid employees. You should log on to the NEST website and go to the ‘Manage Contributions’ section to see which date you have specified. It is the last day of the earnings period that is important. In the example below, the last day of the calendar month has been specified, and so the ‘Monthly earnings period’ in Payroll Manager should be set to ’31’ (Payroll Manager will automatically adjust for months which have less than 31 days). If you don’t have monthly paid employees then please ignore the contents of this field.

- Adjust weekly/2-weekly/4-weekly earnings period relative to pay date by – As part of the initial setup procedure on the NEST website you would have been asked to specify what NEST refer to as the ‘earnings period end date’ for weekly (and/or 2-weekly and 4-weekly) paid employees. You should log on to the NEST website and go to the ‘Manage Contributions’ section to see which date you have specified. It is the last day of the earnings period that is important. In the example below, the pay frequency is weekly and the last day of the earnings period is 31 August 2016 (a Wednesday). If the pay date you have set in Payroll Manager matches with the pay date on the NEST website then no adjustment is needed, otherwise you may need to make adjustments on this screen when it comes to uploading files to NEST. If you don’t have weekly/2-weekly/4-weekly paid employees then please ignore this box.

Click ‘OK’ to save this information.
2- Adding the details of your NEST Pension Scheme
Click ‘Pensions’ from the main menu, then click ‘Pension Scheme Details’.
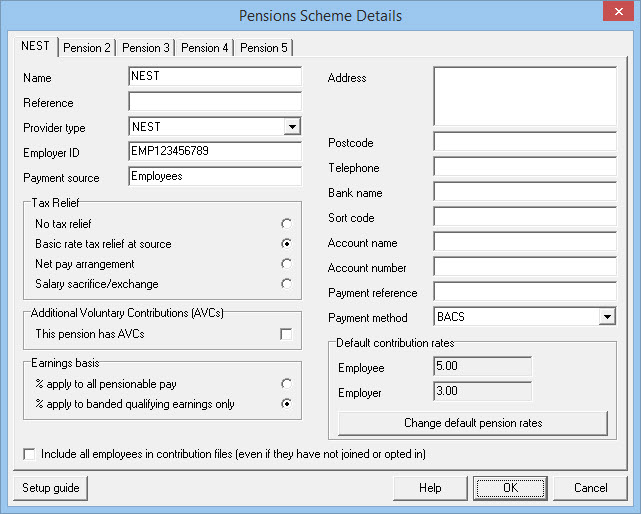
The tabs along the top of this screen allow you to add the details of up to 5 different pension schemes.
VERY IMPORTANT: If you have employees that are paid at different pay frequencies (e.g. some weekly and some monthly paid employees) then you should create a separate pension scheme within Payroll Manager for each pay frequency and name them accordingly (e.g. ‘NEST weekly’ and ‘NEST Monthly’).
Click on the first available tab along the top of this screen and enter the following details:
- Name – This is the name by which you wish to refer to the pension scheme. This will appear on the Pay Details screen and on all reports. You should enter ‘NEST‘ (or e.g. ‘NEST-weekly’ if you have multiple pay frequencies) in this box.
- Reference – An optional field where you can add your own reference to appear on reports. You can leave this field blank if you wish.
- Provider type – Select ‘NEST’ from the drop-down list.
- Employer ID – This is the unique employer identifier given to you when you complete the employer setup process on the NEST website and is stated in all communications to the employer. e.g. EMP123456789
- Payment Source – When setting up your details on the NEST website you would have been asked to specify a ‘Payment Source’. You must enter the name of the payment source here in exactly the same format as that used on the NEST website (n.b. this field is case sensitive).

- Tax relief – select Basic rate tax relief at source. It is very important to have this set correctly at this stage as this setting affects the calculation of pension contributions and cannot be changed later. Note: If you are using ‘Salary Sacrifice’ then please see our Salary Sacrifice Pension Schemes guide before proceeding.
- Additional Voluntary Contributions (AVCs) – Leave the ‘This pension has AVCs’ option unticked (NEST do not allow for AVCs).
- Include all employees in contribution files (even if they have not joined or opted in) – leave this box unticked (it is used for some other pension schemes).
Earnings basis – select one of the following options:
- % apply to all pensionable pay – If you wish the pension contribution to be calculated on all pensionable earnings (i.e. from the first pound of pensionable earnings) then tick this box, otherwise leave it un-ticked.
- % apply to banded qualifying earnings only – If you wish the pension contribution to be calculated on qualifying earnings only – i.e. those earnings falling between the Lower and Upper thresholds for automatic enrolment then tick this box, otherwise leave it un-ticked. (The bands for 2024-25 and for 2025-26 are £120 - £967 for weekly paid employees and £520 - £4189 for monthly paid employees. ) This is the most common setup for a NEST pension, however if you are not sure how your particular scheme operates then you should contact NEST (Moneysoft cannot tell you how your particular scheme operates).
The fields on the top right hand side of the screen (Address, Postcode, Telephone etc.) are not used for auto-enrolment purposes and so can be left blank. If you wish to, you could record your pension scheme details here for reference.
Default contribution rates:
These are pre-set to whatever the current legal minimum contributions are, which for 2024-25 and for 2025-26 are 5% (employee) and 3% (employer). If you wish to set different default rates then click the button marked ‘Change default pension rates’, otherwise click ‘OK’ to save the Pension Scheme Details information.
Note: Setting the default contribution rates on this screen does not automatically set the contribution percentages for each employee. You still need to enter the actual percentages individually on the ‘Employee Details’ screen (see section 4 below). Setting the ‘default’ percentage on this screen simply makes the process slightly quicker.
3- Assessing the workforce
The ‘Assessment’ procedure determines which of your workers must be automatically enrolled into the pension scheme and is dependent on the age and earnings of each worker at the point of being assessed. You should run the first assessment on your Duties Start Date, and then again on every subsequent pay period, to determine which employees need to be added to the scheme .
Running the assessment
- Select the relevant pay period on the Pay Details screen.
- From the main menu click ‘Pensions’ and then ‘Assessment’.

- The ‘Layout’ selector at the top of the report allows you to display the assessment information in a number of ways (e.g. by Employee, by Category etc.).
- The ‘Category’ of each employee determines the next course of action. You should consult the guidance given by your pension provider and / or The Pensions Regulator if you are unsure how to proceed. In general terms employees categorised as ‘Eligible Jobholders’ will need to be automatically enrolled into your pension scheme, whereas ‘Non-eligible Jobholders’ and ‘Entitled Workers’ have the right to join if they wish.
4 – Adding Employees and setting pension contributions
After following the Assessment procedure you can then add the relevant employees to the pension scheme.
From the main menu click ‘Employees’ then ‘Employee Details’ then click on the ‘Auto-Enrolment pensions’ tab.
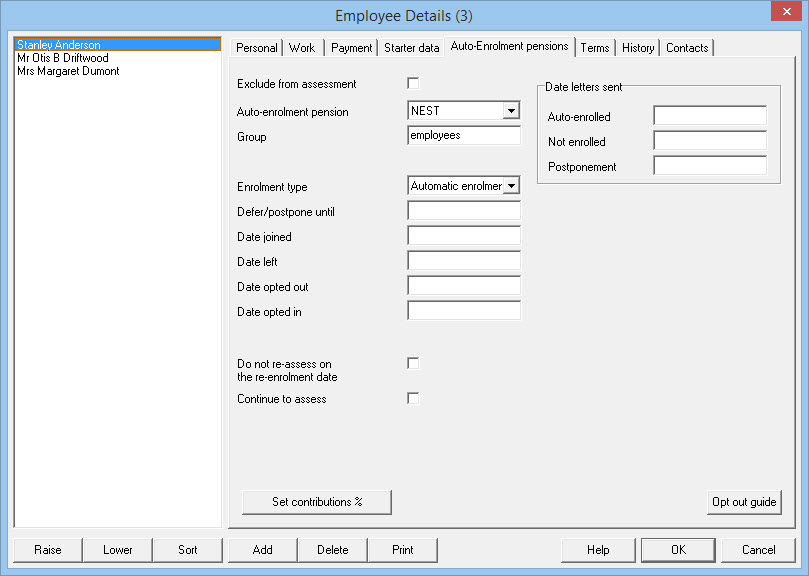
The following details need to be set for each employee that is joining the NEST pension scheme. Do NOT complete these details for employees that are not joining the scheme.
- Exclude from assessment – Leave this box un-ticked. If you have individuals on the payroll that are not deemed to be subject to Workplace Pensions Legislation (e.g. they are not ordinarily working in the UK) then you can exclude them from the assessment process by ticking this box. You should consult The Pensions Regulator documentation before selecting this option.
- Auto-enrolment pension – Choose the appropriate pension scheme from the drop-down list i.e ‘NEST’. You should only set this field for employees that are being auto-enrolled, opting-in or joining the pension scheme. Leave this field blank for all other employees.
- Group (This field MUST be completed for each employee that is joining NEST) – When setting up the employer information on the NEST website you would have been asked to create at least one ‘group’ in which to place each worker. You should enter the group name here and it must exactly match that entered on the NEST website (i.e. it is case sensitive). You should log on to the NEST website and select ‘Manage Groups’ to check the group name that you have chosen.
- Enrolment type (This field MUST be completed for each employee that is joining NEST) – The enrolment type of the worker is determined by whether they’re enrolling as a result of automatic enrolment or voluntarily. Choose the appropriate category from the drop-down list.
- Automatic enrolment – For Eligible Jobholders
- Opt in – For Non-eligible Jobholders or Eligible Jobholders during a waiting period.
- Worker without qualifying earnings – For Entitled Workers.
- Others – Only for use in exceptional circumstances – Please speak to NEST for further guidance.
- Voluntary – Only for use in exceptional circumstances (i.e. if an employee is joining the pension scheme voluntarily before the staging/duty start date)
- Defer/postpone until – If you are using postponement for an employee enter the deferral date here, otherwise leave this field blank.
- Date joined (This field MUST be completed for each employee that is joining NEST) – Enter the date from which the workers enrolment in the pension scheme is effective. This is usually the date that the worker becomes eligible for automatic enrolment.
- Date left – If the employee leaves the pension scheme then enter the leaving date here, otherwise leave this field blank.
- Date opted out – If the employee has opted out of the pension scheme then enter the opt out date here, otherwise leave this field blank.
- Date opted in – If the employee wishes to opt in to the pension scheme then enter the opt in date here, otherwise leave this field blank.
- Do not re-assess on the re-enrolment date – Leave this field blank at this point. Re-enrolment is a procedure which takes place 3 years after the staging/duty start date and applies to employees that have previously opted out of the pension scheme. Employees that opt-out within 12 months prior to to the re-enrolment date do not need to be assessed at this point – in which case you would tick this box.
- Continue to assess – If the employee has been assessed as an entitled worker and has then chosen to ‘join’ a pension scheme then you still need to assess them in each pay period to see if they become an eligible or non-eligible jobholder. Tick this box in order to keep assessing such employees
- Set contributions % – Click on this button to set the relevant pension contribution percentages for that employee. (Note: in some circumstances you may wish to specify a fixed amount, rather than a percentage. In such cases you should ignore this button, and instead manually enter the amounts in the ‘Pensions’ section of the ‘Pay Details’ screen).
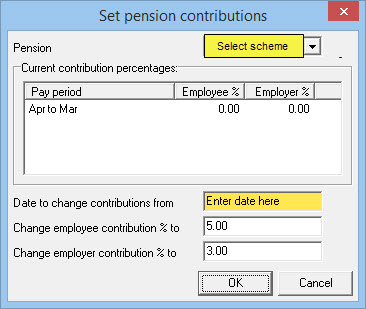
- Ensure the correct pension scheme has been selected, enter the date that you wish to set the contributions from (which is the first pay date on which contributions will be taken), make sure that the contribution percentages are set correctly, and click ‘OK‘. Payroll Manager will then automatically add these deductions to the ‘Pay Details’ screen.
- Date Letters Sent (top-right) – (Auto-enrolled, Not enrolled, Postponement)
Leave these fields blank initially. Payroll Manager will automatically populate these fields as appropriate (see section 5 below – ‘Sending letters to employees’).
A report is available which allows you to check that all employee pension details have been input correctly. Click ‘Pensions’ from the main menu and then ‘Employee Pensions Report’ to produce this report.
5- Sending letters to employees.
Following the ‘Assessment’ procedure described in section 3 of this guide, you should communicate with each employee to inform them if they have been automatically enrolled into your pension scheme or not. The Pensions Regulator provides three letter templates for use when employees are being ‘automatically enrolled’, for those that are ‘not being automatically enrolled’ and those for whom you are using ‘postponement’. Payroll Manager has each of these templates built-in, to allow you to produce the relevant letter for each employee.
Letters can be produced as follows:
- From the main menu click ‘Pensions‘ then ‘Letters‘ and select the appropriate letter type.
- Select the relevant employee(s) and click ‘OK’.
- If you choose to print / save as pdf / email the letter to the employee then Payroll Manager will ask if you wish to record this fact in the employee’s record. The date will automatically be recorded on the Employees – Employee Details – Auto Enrolment Pensions’ screen, in the ‘Date letters sent’ section.
6 – Uploading information to NEST
NEST allows you to submit information to them in a number of different ways. You can choose the method which suits you best:
- Entering information directly online – If you wish, you can manage the whole process of adding employees and informing NEST of their pension contributions by logging in and typing this information directly on the NEST website. If you only have a small number of employees then you may find this the best option. You should speak to NEST or consult the NEST Help Centre website for more information about how to do this. If you choose to use this method then you can ignore the remainder of this guide.
- NEST Web Services – Allows Payroll Manager to communicate directly with NEST to send enrolment, contribution and payment information.
- CSV file upload – Payroll Manager is able to produce two types of ‘csv’ file (one for enrolling employees, the other containing details of their pension contributions) which you can then upload by logging on to the NEST website (as an alternative to using NEST web services). Details of how to produce these csv files are given below. You should speak to NEST or consult the NEST Help Centre website for advice on how to upload these files.
- SFTP (Secure File Transfer Protocol) – This method of file transfer is NOT supported by Payroll Manager, and has been designed by NEST primarily for large employers who need to send details of thousands of employees at a time.
NEST Web Services
NEST has developed a system called ‘NEST Web Services’ which allows payroll software to submit information directly, rather than enter / upload it on the NEST website. NEST offer a number of different services, and Payroll Manager currently supports the following:
- ‘Enrol workers’ – Sends all worker enrolment data direct to NEST.
- ‘Update contributions’ – Sends NEST the earnings and contribution details for a particular contribution schedule / pay period.
- ‘Approve for Payment’ – Sends NEST an employer’s confirmation that payment of a contribution schedule for an agreed amount will be made by the employer (e.g. BACS, CHAPS or Debit Card) or can be collected by NEST (Direct Debit).
NEST Web Services – Enrolling workers to the NEST pension scheme
- From the main menu click ‘Pensions’ then ‘Generate upload files’ then click ‘NEST’ and choose the ‘Enrolment’ option.
- Select the employees that you wish to include in the submission and click ‘OK’.
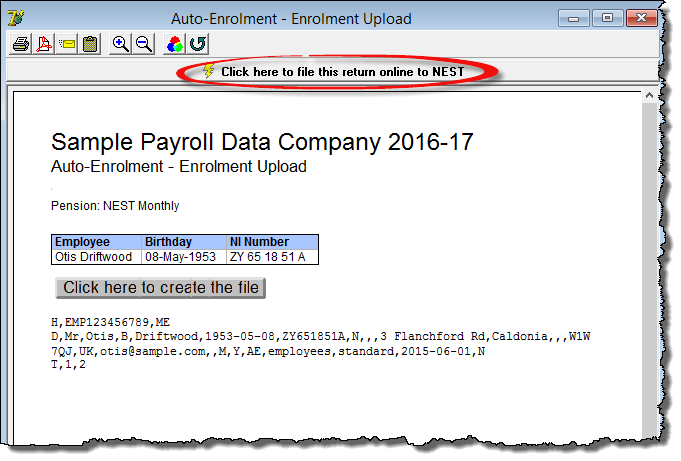
- The report shows all employees to be included in the ‘Enrol Workers’ submission, together with their date of birth and NI number. In practice the actual submission contains more detailed information.
- Click the button along the top of the report marked ‘Click here to file this return online’. (NOTE: You should ignore the button on the report marked ‘Click here to create the file’, as this is only used for creating csv files, and is not used with NEST Web Services.)
- Payroll Manager will run an internal validation routine on your data. You may find that you have to provide additional information (e.g. employees ‘title’ or extra lines of address) in the Employee Details section of the software in order for NEST to accept your submission.
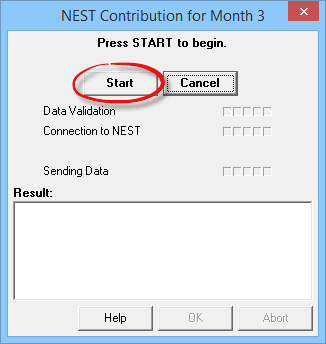
- Click on the ‘Start’ button to submit the information to NEST. Payroll Manager will report back on the status of the submission, and will store this information in the Submission Log (Click ‘Tools’ then ‘Online Filing’ and select ‘Submission Log’ if you wish to see these details).
- You should always check the details of the NEST response message to see if NEST have sent back any errors.
- If you wish you can check that the submission has been successful by logging on to the ‘Manage Employees’ section of the NEST website.
NEST Web Services – sending contribution details to NEST
- Make sure that you have the correct pay period selected on the ‘Pay Details’ screen, then from the main menu click ‘Pensions’ then ‘Generate upload files’ then click ‘NEST’ and choose the ‘Contributions’ option.
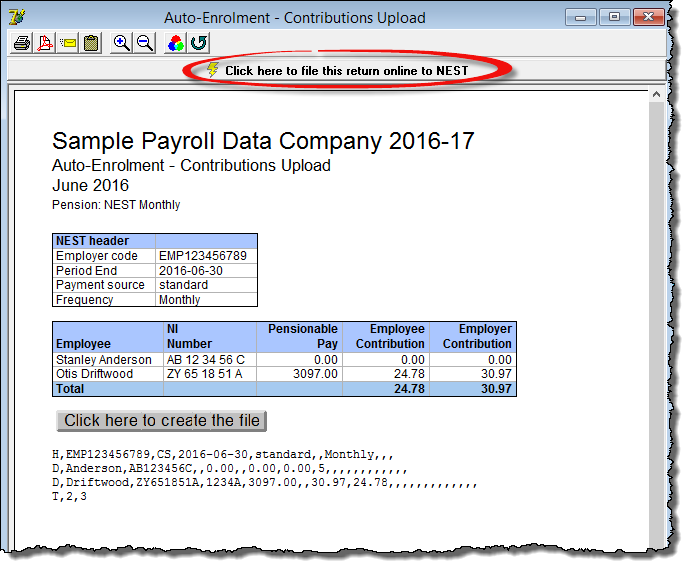
- The report shows which employees will be included in the ‘Update contributions’ submission, together with their NI number, Pensionable pay and Employee and Employer pension contributions.
- Click the button along the top of the report marked ‘Click here to file this return online’ (NOTE: You should ignore the button on the report marked ‘Click here to create the file’, as this is only used for creating csv files, and is not used with NEST Web Services).
- Payroll Manager will run an internal validation routine on your data. You may find that you have to provide additional information (e.g. employees ‘title’ or extra lines of address) in the Employee Details section of the software in order for NEST to accept your submission.
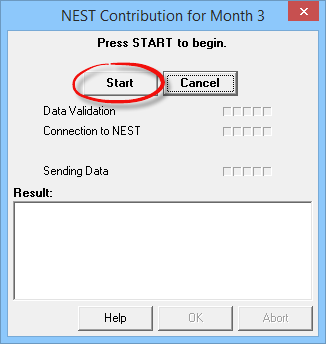
- Click on the ‘Start’ button to submit the information to NEST. Payroll Manager will report back on the status of the submission, and will store this information in the Submission Log (Click ‘Tools’ then ‘Online Filing’ and select ‘Submission Log’ if you wish to see these details).
- You should always check the details of the NEST response message to see if NEST have sent back any errors.
- If you wish you can check that the submission has been successful by logging on to the ‘Manage Contributions’ section of the NEST website.
- IMPORTANT: You also need to authorise the payment of these contributions via the NEST website when you are ready to do so. The ‘Approve for payment’ NEST web service (details below) allows you to do this.
NEST Web Services – Approving the payment of contributions to NEST
This web service is an employer’s authorisation that the total amount payable is correct and is authorisation for payment of the contribution schedule for that amount. For BACS, CHAPS or Debit Cards, the employer is agreeing that they will make a payment for that amount. For Direct Debit, the employer is instructing NEST to collect that amount by Direct Debit.
IMPORTANT: You must already have used NEST Web Services (and not any other method) to submit a successful contributions upload to NEST in order to use this service.
- Make sure that you have the correct pay period selected on the ‘Pay Details’ screen, then from the main menu click ‘Pensions’ then ‘Generate upload files’ then click ‘NEST’ and choose the ‘Approve for Payment’ option.
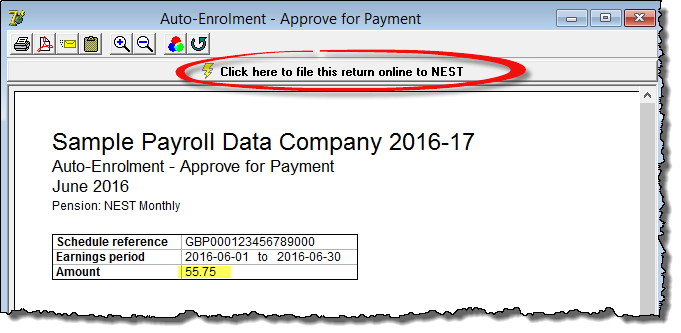
- Payroll Manager will show the total contributions due (employee + employer) for that period. Click the button marked ‘Click here to file this return to NEST’ to approve the payment to NEST.
- If you have a direct debit set up with NEST then the ‘Approve for payment’ submission instructs NEST to collect the relevant pension contributions. Please note that it can take 5 working days for NEST to actually collect the payment after you have instructed them to do so, and you should bear this in mind when submitting the return.
NEST Error Messages:
If you receive an error message whilst attempting to upload information to NEST then please refer to our NEST Error Guide. You may find that you have missing or incorrect information which is stopping the submission from being successful.
CSV file upload
If you are unable to use NEST Web Services (above) for whatever reason then you may choose to generate csv files from Payroll Manager for uploading to the NEST website.
Payroll Manager is able to produce the following csv files:
- A file for enrolling workers into the pension scheme (which Moneysoft calls the ‘Enrolment’ file).
- A file containing details of the employee and employer contributions (which Moneysoft calls the ‘Contributions’ file).
You can produce these files in the following way:
To produce the enrolment file for adding members to the pension scheme:
- From the main menu click ‘Pensions’ then ‘Generate upload files’ then click ‘NEST’ and choose the ‘Enrolment’ option.
- Select the employees that you wish to include in the file and click ‘OK’.
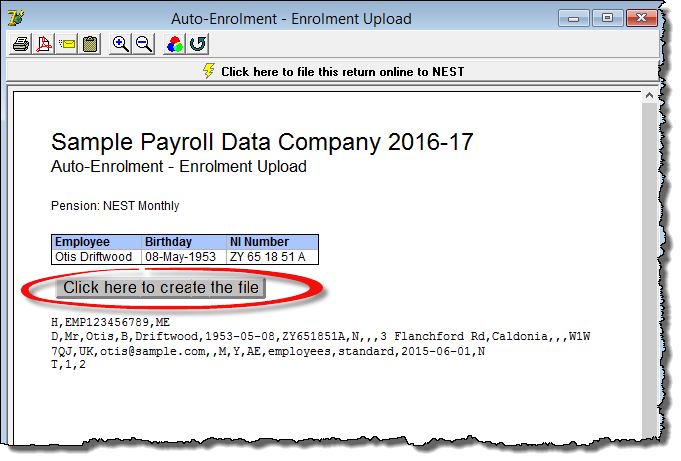
- The report shows which employees will be included in the csv file, together with their date of birth and NI number. In practice the file contains more detailed information, and a representation of how the csv will ‘look’ is shown at the bottom of the report.
- Click the button marked ‘Click here to create the file’ and save it to an appropriate location.
- You can now upload the csv file from the ‘Manage Workers’ section of the NEST website. You should contact NEST if you require support on how to do this.
IMPORTANT: You should not use Excel (or any other spreadsheet software) to open your csv files after creating them as this may reformat some fields which could result in NEST rejecting the file.
To produce the contributions csv file:
- Make sure that you have the correct pay period selected on the ‘Pay Details’ screen, then from the main menu click ‘Pensions’ then ‘Generate upload files’ then click ‘NEST’ and choose the ‘Contributions’ option.
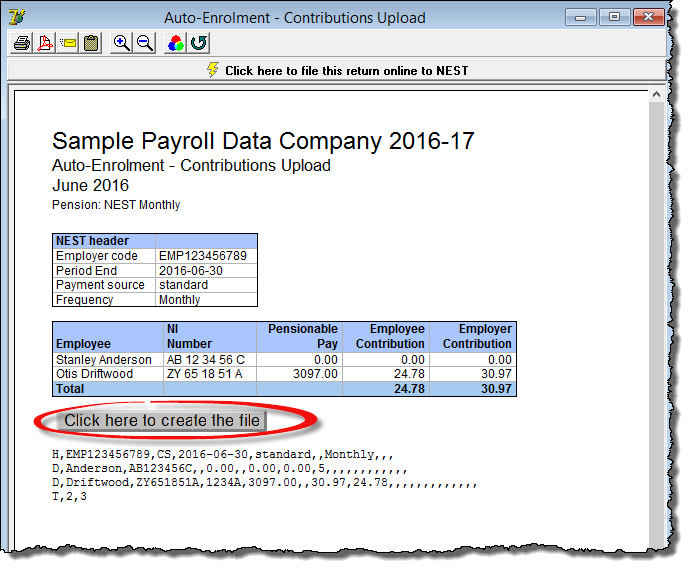
- The report shows which employees will be included in the csv file, together with their NI number, Pensionable pay and Employee and Employer pension contributions. A representation of how the csv will ‘look’ is shown at the bottom of the report.
- Click the button marked ‘Click here to create the file’ and save it to an appropriate location.
- You can now upload the csv file from the ‘Manage Contributions’ section of the NEST website. You will also need to authorise the payment of these contributions via the NEST website when you are ready to do so. You should contact NEST if you require support on how to do this.
IMPORTANT: You should not use Excel (or any other spreadsheet software) to open your csv files after creating them as this may reformat some fields which could result in NEST rejecting the file.

