Importing employee data into Payroll Manager
This guide shows you how to import static employee information, such as Name, Address, Date of Birth etc. into Payroll Manager. If you are starting to use Payroll Manager mid way through a tax year and have year to date figures for each employee then you can also import this information, which is then stored in the ‘Mid Year Start’ section of Payroll Manager. Please refer to our guide on Starting mid way through the year for further information.
Payroll Manager is able to import employee details from CSV (Comma Separated Value) files. Many (but not all) software packages provide the facility to export data in CSV format, and will do so in different ways. For this reason we are not able to give exact instructions on how to export your data, but instead we have produced a list of fields that can be imported into Payroll Manager in CSV format.
How to Import
Important: Please be aware that you must import all data relevant to a particular employee in the same operation, i.e. it is not possible to import the employee’s name, address, date of birth etc.. and then at a later point return to import their year to date pay
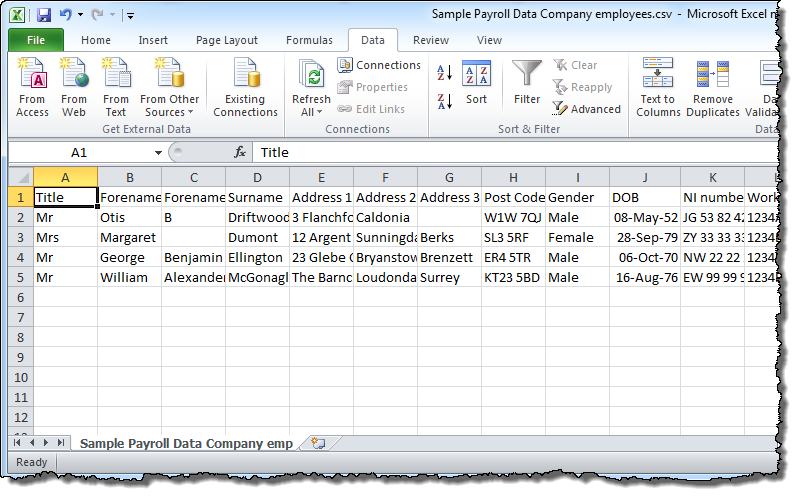
1) – Create the CSV file. The ‘List of data items’ (below) shows which fields can be imported into Payroll Manager. It does not matter in which order these fields appear in your CSV file as you will have the opportunity to ‘map’ each field later on in the procedure. You may have your data in an ‘Excel’ spreadsheet (example below), in which case you can create the CSV file by clicking ‘File – Save As’ and choosing ‘.csv’ as the file type

2) – If you haven’t already done so you need to create a Payroll Manager data file in which to import your information. Click ‘File – New – Create a new blank file’ to create the new file.
3) – From the main menu in Payroll Manager click ‘Tools – Import Data – Import employees from a CSV file’. Browse to where your csv file is located, and double click the file. You will then see the ‘Import Employee from a CSV file’ screen.
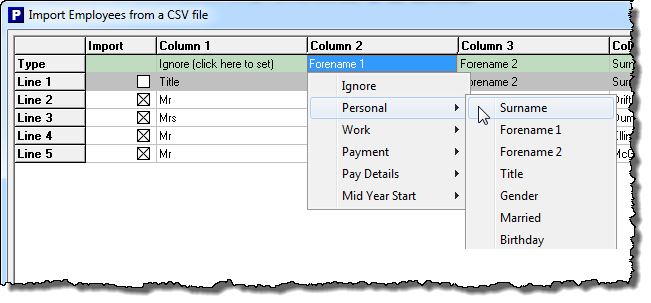
4) – Work your way along the columns from left to right, ‘mapping’ each of your data fields to those within Payroll Manager (Please refer to the ‘List of data items’ which appear at the end of this guide to see which fields Payroll Manager is able to import). To map a particular field, click on ‘Ignore – (click here to set)’ in the relevant column and select the data type from the drop-down list that appears. You may have additional fields within your CSV file that Payroll Manager is not able to import – if so, leave these columns set to ‘Ignore’.
IMPORTANT: Some Payroll Software (e.g.Sage) will have assigned a ‘PayrollID’ to each employee and reported this in FPS returns to HMRC. If so then you should ensure that you import this PayrollID into the ‘Works Number/Payroll ID’ field within Payroll Manager.

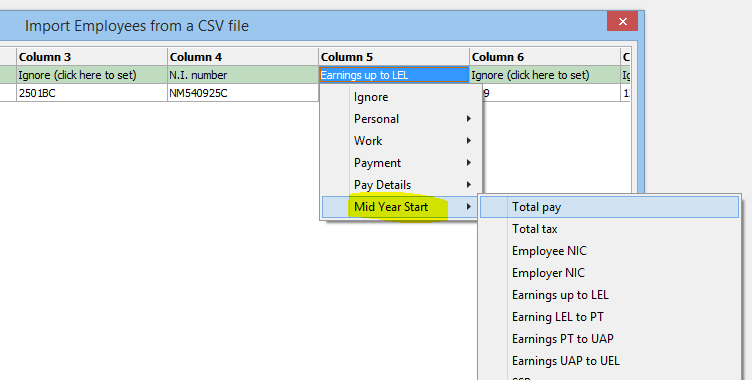
If you are importing mid way through a tax year and wish to import year to date figures for each employee then you should map the relevant fields in the ‘Mid Year Start’ section.

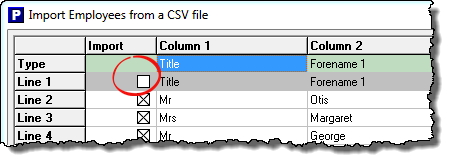
5) – Each employee in your CSV file should be represented by a single row of data on the import screen. If your CSV file also contains column headings (such as Title, Forename1 etc. in the example below) then you need to tell Payroll Manager not to attempt to import this row of data by unchecking the ‘import’ box as shown.

6) – The bottom of the import screen shows any errors which will prevent importing, indicating that the format of some of your data does not match the format required by Payroll Manager. Any such data items are highlighted in red. You then need to choose whether or not to import this field by setting column header to ‘Ignore’, or to go back and edit you CSV file (using the ‘List of Data items’ as a reference) and then start the import process again.

7) – When there are no errors showing, you can click the ‘Import’ button to import your employee data.

List of data items that can be imported into Payroll Manager
The following items can be imported from your CSV file into Payroll Manager. Please note that some fields are case-sensitive, whilst others (such as N.I Number) require exact data formats in order for the import to be successful. It is worth taking the time to validate your CSV data against the following criteria, editing as necessary before starting the import procedure.
| Personal | Data Format |
| Surname | A-Z upper or lower case |
| Forename 1 | A-Z upper or lower case |
| Forename 2 | A-Z upper or lower case |
| Title | A-Z upper or lower case |
| Gender | M, Male, F or Female (must have Upper Case first letter) |
| Birthday | dd-mm-yy, ddmmyy, dd/mm/yy |
| Address 1 | A-Z, 0-9 upper or lower case |
| Address 2 | A-Z, 0-9 upper or lower case |
| Address 3 | A-Z, 0-9 upper or lower case |
| Address 4 | A-Z, 0-9 upper or lower case |
| Postcode | space required between parts e.g. SP6 1QX |
| Telephone | digits 0-9 |
| Mobile | digits 0-9 |
| must contain @ and . symbols | |
| PDF password | A-Z, 0-9 upper or lower case |
| Work | Data Format |
| Job title | A-Z upper or lower case |
| Department | A-Z, 0-9 upper or lower case |
| Works number / Payroll ID (* see note below) | A-Z, 0-9, dashes and hyphens, upper or lower case |
| N.I. number | must be valid format e.g. AB123456C |
| Date started | dd-mm-yy, ddmmyy, dd/mm/yy or blank |
| Date left | dd-mm-yy, ddmmyy, dd/mm/yy or blank |
| Deceased | Y or Yes (must have Upper Case first letter) |
| Stakeholder pension reference | A-Z, 0-9 upper or lower case |
| Occupational pension reference | A-Z, 0-9 upper or lower case |
| Student | Y or Yes (must have Upper Case first letter) |
| Director | Y or Yes (must have Upper Case first letter) |
| Alternative scheme for directors NIC | Y or Yes (must have Upper Case first letter) |
| Directorship start date | dd-mm-yy, ddmmyy, dd/mm/yy or blank |
| Directorship end date | dd-mm-yy, ddmmyy, dd/mm/yy or blank |
| Payment | Data Format |
| Pay frequency | Weekly, Monthly, 2-Weekly or 4-Weekly (Upper Case first letter) |
| Pay method | Cash, Cheque, BACS or Other (must have Upper Case first letter) |
| Delivery method | Print, E-mail or Other (must have Upper Case first letter) |
| Bank name | A-Z, 0-9 upper or lower case |
| Account name | A-Z, 0-9 upper or lower case |
| Bank sort code | e.g.11-22-33 or 112233 |
| Bank account number | A-Z, 0-9 upper or lower case |
| Bank payment reference | A-Z, 0-9 upper or lower case |
| Building society reference | A-Z, 0-9 upper or lower case |
| Pay Details | Data Format |
| Tax code | must be a valid tax code e.g 810L, BR, 0T etc. |
| Week 1/ Month 1 | Y or Yes (must have Upper Case first letter) |
| NI Table Letter | must be one of the following upper case letters: A, B, C, D, E, H, J, L, M, X |
| Mid Year Start | Data Format |
| Total Pay | Numerical values greater than or equal to zero |
| Total Tax | Numerical values greater than or equal to zero |
| Employee NIC | Numerical values greater than or equal to zero |
| Employer NIC | Numerical values greater than or equal to zero |
| Earnings up to LEL | Numerical values greater than or equal to zero |
| Earnings LEL to PT | Numerical values greater than or equal to zero |
| Earnings PT to UEL | Numerical values greater than or equal to zero |
| SSP | Numerical values greater than or equal to zero |
| SMP | Numerical values greater than or equal to zero |
| SPP | Numerical values greater than or equal to zero |
| ASPP | Numerical values greater than or equal to zero |
| SAP | Numerical values greater than or equal to zero |
| Pension – Employee Contribution | Numerical values greater than or equal to zero |
| Pension – Employer Contribution | Numerical values greater than or equal to zero |
| Student loan repayments | Numerical values greater than or equal to zero |
| Payroll giving | Numerical values greater than or equal to zero |
* Note: Your previous payroll software may have used a ‘PayrollID’ when submitting RTI returns. Sage software for example refers to the use of an ‘RTI Payroll ID’. In such cases you should import this PayrollID into the ‘Works Number / Payroll ID’ field in Moneysoft Payroll Manager.

