NEST error code IFC01916 – “You must provide a valid header or trailer record”
Some users are experiencing problems when attempting to upload pension information to NEST. The majority of these errors are caused by a mis-match of information between what has been entered on the NEST website (when initially setting up the NEST pension scheme) and the data that has been entered into Payroll Manager. This can lead to error messages being generated by NEST when you attempt to upload information.
This guide is designed to help if you get the error code IFC01916 – “You must provide a valid header or trailer record” when you attempt to upload pension contribution information to NEST.
What is the ‘NEST header’ record?
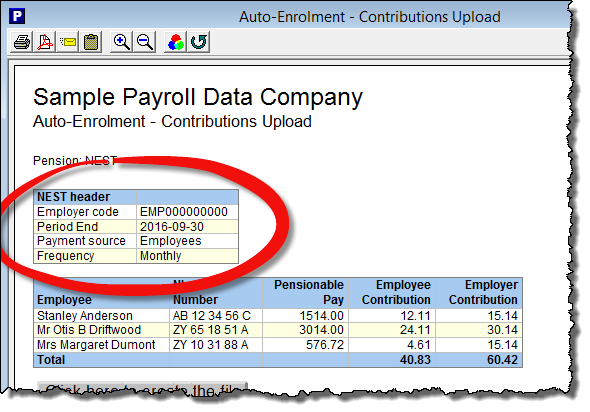
The NEST ‘header record’ is part of the pension contribution upload file sent to NEST, and contains (amongst other things) details of the NEST Employer ID, the relevant pay period, the Payment source and the Pay frequency of the employees.
– Click ‘Pensions’ then ‘Generate upload files – NEST – contributions’ from the main menu in Payroll Manager:
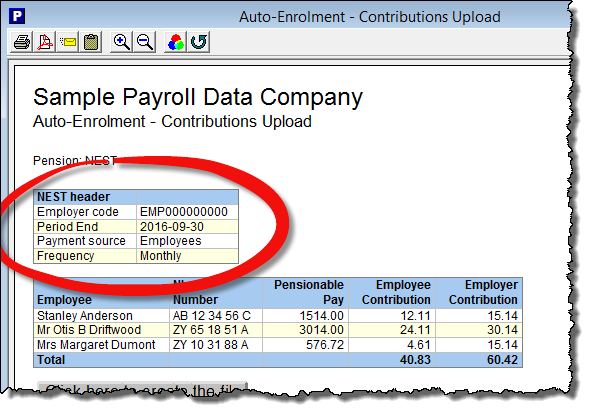
The top left hand side of this report shows the contents of the NEST ‘Header Record’ as produced by Payroll Manager. NEST return error code IFC01916 when their system objects to one or more of these header record items. Unfortunately NEST does not tell us which particular item or items is causing the problem and so it is necessary to compare each header record item with that specified on the NEST website in order to resolve this issue. This can be done as follows:
Identifying the cause of the problem
– Log on to the NEST website and select ‘Manage Contributions’.
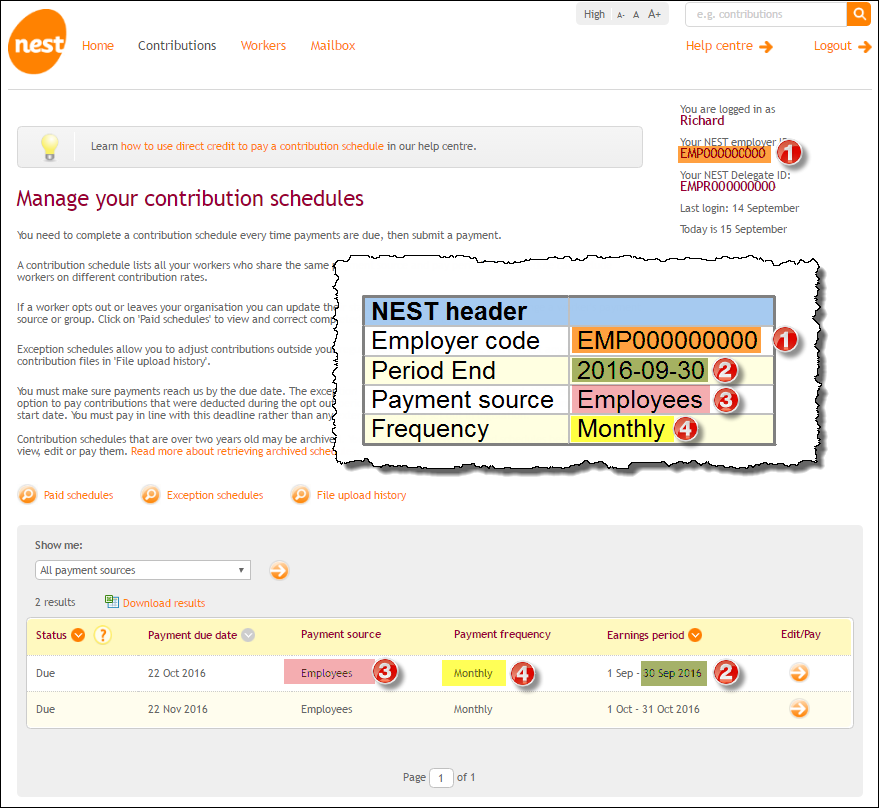
The NEST ‘Contribution schedules’ are shown in a table towards the bottom of the page. You should compare the items shown in this table with those in the Payroll Manager header record. If there are discrepancies then please refer to the ‘Fixing errors / making adjustments’ section below.
- Employer Code/ID- This is displayed at the top-right hand of the NEST website, and is typically in the format EMP followed by 9 digits (e.g. EMP000000000).
- Period End – compare the last day of the ‘Earnings period’ on the NEST website (in this example, 30 Sep 2016) with the ‘Period End’ date in the Payroll Manager header record.
- Payment source – compare the ‘Payment source’ on the NEST website with that in the Payroll Manager header record. These items should match exactly and are case sensitive.
- Frequency – Compare the ‘Payment Frequency’ on the NEST website with the ‘Frequency’ in the Payroll Manager header record. They should match exactly, word for word (e.g. if one shows as ‘Tax monthly’ whilst the other shows ‘Monthly’ then this is a discrepancy, and will cause a problem).
Fixing errors/making adjustments
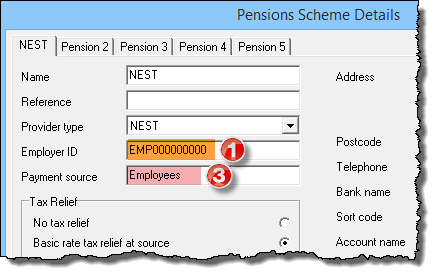
- If the ‘Employer code/ID’ (1) does not match then click ‘Pensions’ then ‘Pension Scheme Details’ from the main menu in Payroll Manager and modify the Employer ID to match the NEST website..
- If the Payment source’ (3) doe not match then click ‘Pensions’ then ‘Pension Scheme Details’ from the main menu in Payroll Manager and modify the Payment source to match the NEST website.
- If the ‘Frequency’ (4) does not match then click ‘Employer’ then ‘Employer Details’ from the main menu in Payroll Manager and click on the ‘Auto Enrolment Pensions’ tab along the top of that screen.
- Payroll Manager has fixed pay frequencies of weekly, monthly, 2-weekly and 4-weekly. Unfortunately during the initial setup of your NEST pension scheme, the NEST website would have allowed you to choose from two additional pay frequencies that they refer to as ‘Tax Weekly’ and ‘Tax Monthly, but which do not actually exist within Payroll Manager.
- For monthly paid employees: If the ‘Payment Frequency’ on the NEST website shows as ‘Tax Monthly’, then tick the box in Payroll Manager marked ‘Report frequency as “Tax Monthly” instead of “Monthly”. Leave this box ‘un-ticked’ if the NEST website shows the Payment frequency as ‘Monthly’.
- For weekly paid employees: If the ‘Payment Frequency’ on the NEST website shows as ‘Tax Weekly’, then tick the box in Payroll Manager marked ‘Report frequency as “Tax Weekly” instead of “Weekly”. Leave this box ‘un-ticked’ if the NEST website shows the Payment frequency as ‘Weekly’.
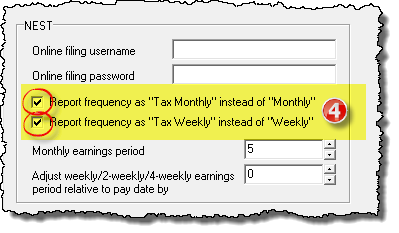
- These boxes have no effect on the actual calculations within Payroll Manager and only serve as a means of matching your uploaded data to that held on the NEST website.
- If the ‘Period End’ (2) does not match then click ‘Employer’ then ‘Employer Details’ from the main menu in Payroll Manager and click on the ‘Auto Enrolment Pensions’ tab along the top of that screen.
- For monthly paid employees:
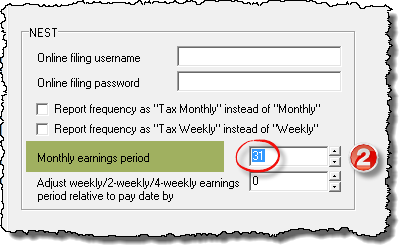
If the NEST website earnings period end is set to the last day of the calendar month, then set the ‘Monthly earnings period’ box in Payroll Manager to ’31’ (Payroll Manager will automatically correct the date for months with 30 days or less – e.g. for September it will use 30, for February it will use 28 or 29 etc.). If the NEST earnings period is set to something other than the last day of the calendar month then set this field accordingly.
- For weekly, 2-weekly and 4-weekly paid employees:
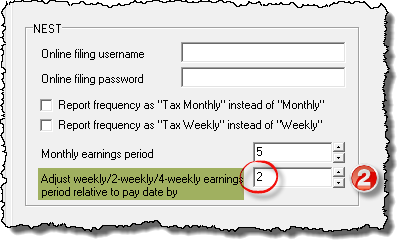
Adjust the reported earnings period relative to the actual pay date up or down by a number of days – e.g. If your actual pay date for weekly paid employees is set to a Friday in Payroll Manager, but the earnings period on the NEST website shows as Monday – Sunday then you should adjust the earnings period by ‘2’ (as there are 2 days between Friday (the actual pay date) and Sunday (what NEST ‘thinks’ is the pay date)).
Check your details and then resubmit
Once you have made the necessary adjustments you should attempt to submit your information to NEST. Click ‘Pensions’ then ‘Generate upload files – NEST – contributions’ from the main menu in Payroll Manager and check that the ‘header record’ items are as expected before submitting.
If you are still having problems after correcting your header record
- In the vast majority of cases, following the steps outlined above will enable you to submit your data successfully to NEST. If you have been through each of these steps and NEST are still returning error message IFC01916 then it may be that NEST are expecting a further item of data (the ‘payment due date’) in your header record.
The ‘Payment due date’ is the latest date by which the payment of pension contributions must have cleared in NEST’s bank account. This date would have been specified during the initial set up of your NEST scheme. In most circumstances NEST do not require the ‘Payment due date’ to be present in the header record, and so by default Payroll Manager does not include it. In some circumstances, such as when NEST cannot match your submitted data to a particular NEST contribution schedule, then you may find that adding this field will lead to a successful submission.
Adding the Payment due date to the header record
- Log on to NEST website and click on ‘Manage Contributions’.
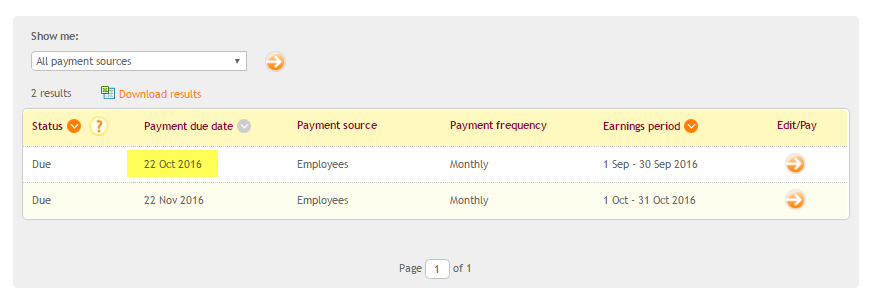 The expected Payment due date is shown in the second column of the contribution schedule (in this example, 22 Oct 2016).
 - Click ‘Employer’ then ‘Employers Details’ from the main menu in Payroll Manager and click on the ‘Auto Enrolment Pensions’ tab along the top of the screen.
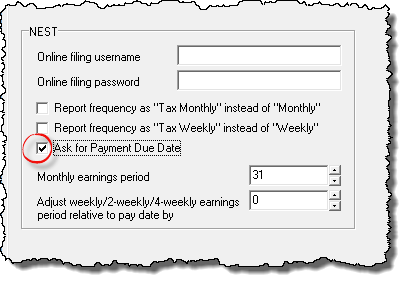
- Tick the box marked ‘Ask for Payment Due Date’ and click ‘OK’. This instructs Payroll Manager to prompt for the input of a Payment due date each time that a NEST contributions file is produced.
- Click ‘Pensions’ then ‘Generate upload files’ from the main menu, then select ‘NEST’ and ‘Contributions’.
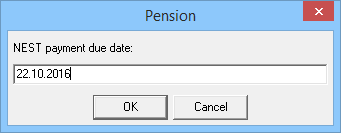
- A box will appear asking you to specify the ‘NEST payment due date’. You should edit the contents of this box accordingly so that it matches the Payment due date on the NEST website. You should enter the date in the format dd.mm.yyyy (e.g. 22.10.2016 ) and click ‘OK’.
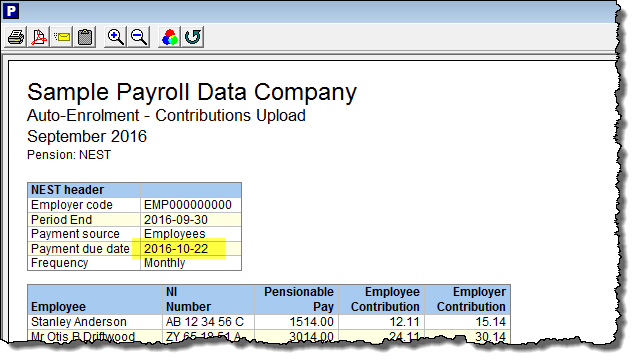
- The NEST header record on the resulting report will now include the Payment due date that you specified. You should now attempt to submit your information to NEST again.

