Construction Industry Scheme (CIS)
Details of how Payroll Manager handles each aspect of CIS are given in the sections below:
1. Adding a new subcontractor
2. Verifying a subcontractor
3. Recording payments to Subcontractors
4. CIS Payment and Deduction Statement
5. CIS 300 Monthly return
1. Adding a new subcontractor
From the main menu in Payroll Manager, click ‘CIS – Add new Subcontractor’, then enter the details of each subcontractor following the guide below:
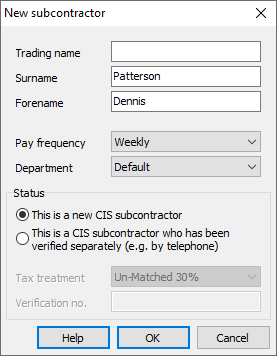
IMPORTANT: The details that you enter on the following screens must match exactly with those used by the subcontractor when registering with HMRC.
- Trading name – If the subcontractor is a Partnership, Company or Trust then enter their Trading name here. If the subcontractor is a sole trader then leave this field blank.
- Surname and Forename – Complete these fields if the subcontractor is a sole-trader or partnership. Leave these fields blank if the subcontractor is a company or trust.
- Pay frequency – select from either weekly, 2-weekly, 4-weekly or monthly. e.g. if you expect to make one payment per week to the subcontractor then choose ‘weekly’, If you expect to make one payment per month then choose ‘monthly.
- Department – this is an optional field and can be left set to ‘Default’ if you wish (if you have a system of departments already set up then you could select the relevant one at this point).
- Status – select ‘This is a new CIS subcontractor‘ if you have not yet verified their status with HMRC. If you have already engaged this subcontractor at some point during the previous two years, and have a valid verification number then select ‘This is a CIS subcontractor that has already been verified’, and enter the ‘Tax treatment and Verification number in the relevant boxes.
- Click ‘OK‘ to continue to the main ‘Subcontractor Details’ screen (which can be accessed at any time by clicking ‘CIS’ then ‘Subcontractor details’ from the main menu in Payroll Manager).
The information to be entered on the ‘Subcontractor Details’ screen depends on the business type of that particular subcontractor (i.e. Sole Trader, Partnership, Trust or Company).
If the subcontractor is a Sole Trader:
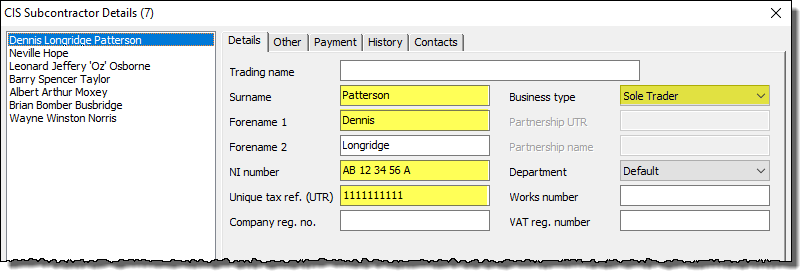
- Set the Business type to ‘Sole Trader‘.
- Leave the ‘Trading name’ field blank.
- Check that the ‘Surname‘ and ‘Forename 1‘ fields are correct.
- Enter the ‘Forename 2‘ , if applicable.
- Enter the subcontractor’s National Insurance number in the NI number field.
- Enter the Unique tax reference (UTR) number. This is a 10-digit number issued to the subcontractor when they registered with HMRC. (It may be called ‘tax reference’ on some HMRC documents).
- Leave the ‘Company reg. no.’ field blank.
- The ‘Department, Works number’ and ‘VAT reg. number’ fields are optional, and can be left blank if you wish.
- The ‘Other’, ‘Payment’, ‘History’ and ‘Contacts’ tabs along the top of the Subcontractor details screen allow you to enter additional, optional data if you wish.
If the subcontractor is a Partnership:
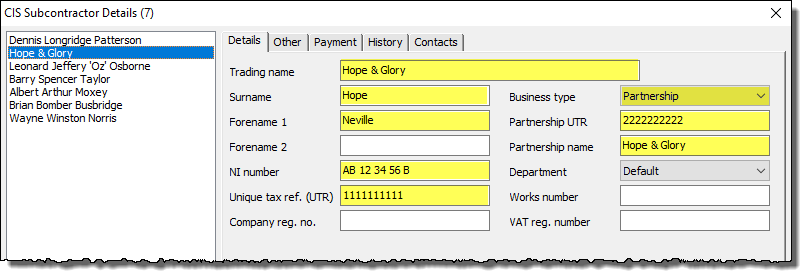
- Set the Business type to ‘Partnership‘.
- Check that the ‘Trading name‘ field contains the correct partnership name.
- Check that the ‘Surname‘ and ‘Forename 1‘ fields are correct.
- Leave the ‘Forename 2’ field blank.
- Enter the partners individual National Insurance number in the NI number field.
- Enter the Unique tax reference (UTR) number of the ‘Registering Partner’. This is a 10-digit number issued to the subcontractor when they registered with HMRC. (It may be called ‘tax reference’ on some HMRC documents).
- Leave the ‘Company reg. no.’ field blank.
- Enter the ‘Partnership UTR‘. This is the UTR issued by HMRC when the partnership was registered, and is different from the UTR of the individual partner.
- The ‘Partnership name’ will be the same as the ‘Trading name’.
- The ‘Department, Works number’ and ‘VAT reg. number’ fields are optional, and can be left blank if you wish.
- The ‘Other’, ‘Payment’, ‘History’ and ‘Contacts’ tabs along the top of the Subcontractor details screen allow you to enter additional, optional data if you wish.
If the subcontractor is a Limited Company or Trust
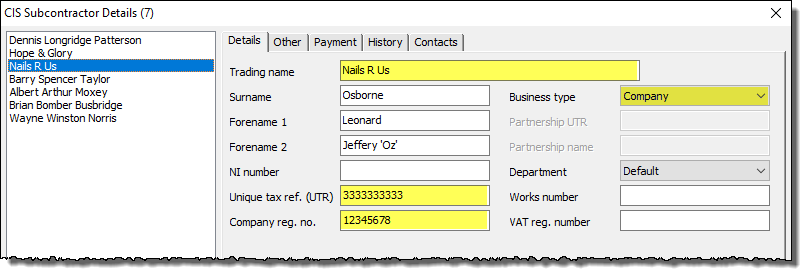
- Set the Business type to ‘Company‘ (or ‘Trust’)’.
- Check that the ‘Trading name‘ field contains the correct company (or trust) name.
- You can leave the ‘Surname’, ‘Forename 1’ and ‘Forename 2’ fields blank, as these details will not be submitted to HMRC in Verification requests or CIS 300 monthly returns. You may choose to store the contact details of an individual related to the company in these fields if you wish.
- Leave the ‘NI number’ field blank.
- Enter the Unique tax reference (UTR) number of the company/trust‘. This is a 10-digit number issued to the company when it was registered with HMRC. (It may be called ‘tax reference’ on some HMRC documents).
- Enter the ‘Company reg. no.’ (CRN) for the company.
- The ‘Department, Works number’ and ‘VAT reg. number’ fields are optional, and can be left blank if you wish.
- The ‘Other’, ‘Payment’, ‘History’ and ‘Contacts’ tabs along the top of the Subcontractor details screen allow you to enter additional, optional data if you wish.
2. Verifying a Subcontractor
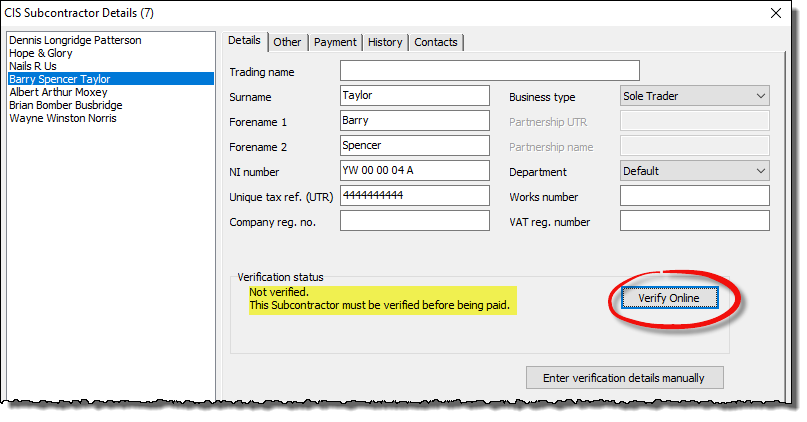
After checking that all details on the ‘CIS – Subcontractor Details‘ screen have been entered correctly, make sure that you have the correct subcontractor selected, and click on the button marked ‘Verify Online‘ (Payroll Manager can verify one subcontractor at a time).
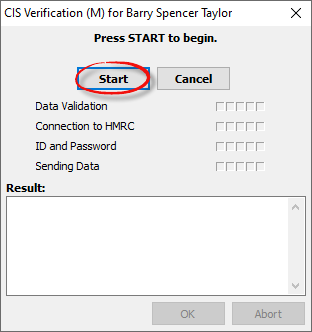
Click on the ‘Start‘ button
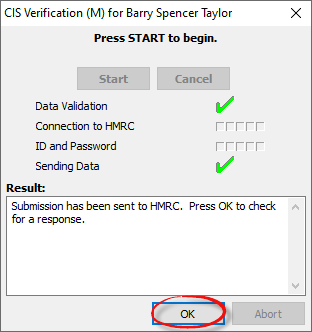
Payroll Manager will submit the verification request to the ‘Government Transaction Engine’. Click ‘OK‘ to check for the response from HMRC.
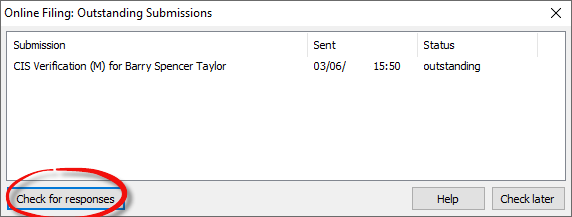
Usually HMRC will respond to the request in a matter of seconds. In some circumstances (e.g. if HMRC systems are experiencing problems), it may take longer for your response to arrive. Click on the button marked ‘Check for responses‘.
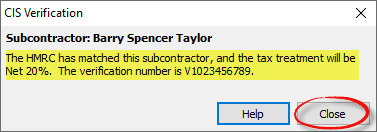
Once Payroll Manager has received the HMRC response it will display the corresponding message giving details of the verification number and tax treatment to be used. (e.g. below). Click on the ‘Close‘ button.
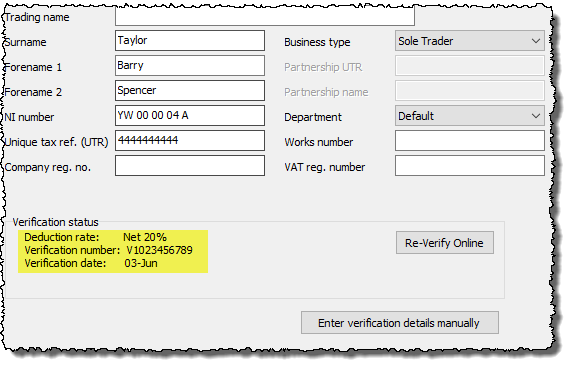
The verification details will then be displayed on the ‘Subcontractor details’ screen.
If HMRC cannot match the details that you have provided with that of a subcontractor on their own systems then the response message will indicate that the subcontractor is ‘unmatched’ and that the CIS deduction rate will be set to 30%. In such cases you should check that the details you have entered are correct (and if not, edit the relevant details and click the ‘Re-Verify Online’ button to try again). If the subcontractor still shows as unmatched then you must use the 30% deduction rate, or contact HMRC to discuss why they are sending this result (see Construction Industry Scheme: general enquiries).
3. Recording payments on the ‘CIS Subcontractor Payment Details’ screen
Details of payments made to subcontractors, along with any deductions, are recorded on the ‘CIS Subcontractor Payment Details’ screen. The name of each subcontractor is displayed horizontally across the screen, and a series of tabs below that give access to the relevant sub-section of this screen. These tabs/screens are explained in detail below:
Tax treatment:
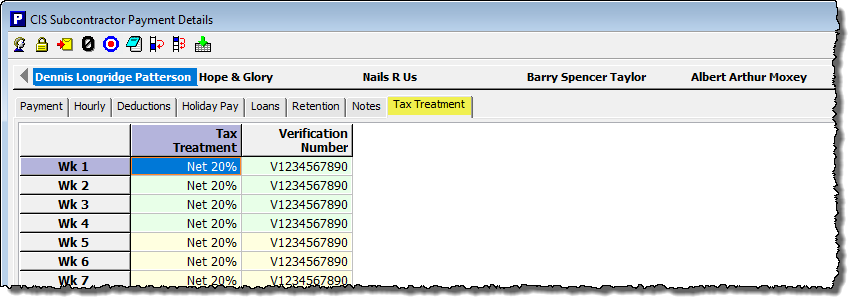
This screen shows the Tax Treatment (i.e. Gross 0%, Net 20% or unmatched 30%) and verification number for the subcontractor in each particular payment period. This information must be in place for each period in which the subcontractor is receiving a payment.
Payments:
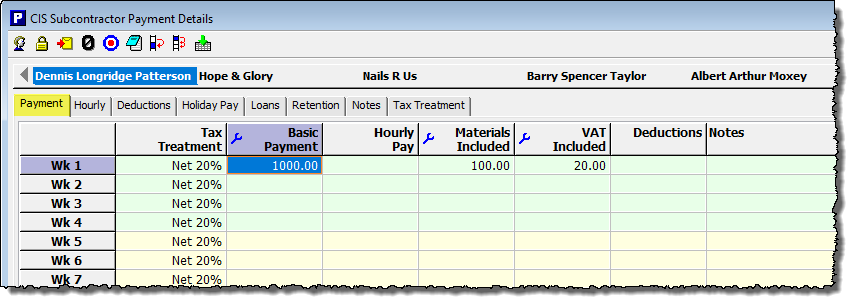
Enter payments made to the subcontractor ‘Basic Payment‘ column. If the subcontractor is instead paid by the hour then click on the ‘Hourly‘ tab to enter rates and hours.
You can change the name of the of the ‘Basic Payment’ column to something else if your wish (e.g. to ‘Invoice amount’) by clicking on the blue ‘spanner’ in the column heading and entering a new term. The new name will apply to that particular subcontractor only.
Enter the cost of Materials and VAT (if applicable) in the appropriate columns. By default, the system works on the basis that amounts entered in these columns have been included in the basic payment (e.g. £1000 Basic Payment, £100 Materials and £20 VAT will result in a gross payment of £1000 and an amount subject to deduction of £880). If you wish to record things differently so that that Materials and VAT are shown as additions to the Basic Payment, then click on the blue ‘spanner’ symbol in the Materials / VAT column headings, and select the options to ‘add’ these items.(Using figures from the example above, you would then enter £100 in the materials column, £20 in the VAT column, and £880 in the Basic Payment column).
The ‘Deductions’ and ‘Notes’ columns on this page will display deductions / notes that have been entered via the sub-screens detailed below:
Deductions:
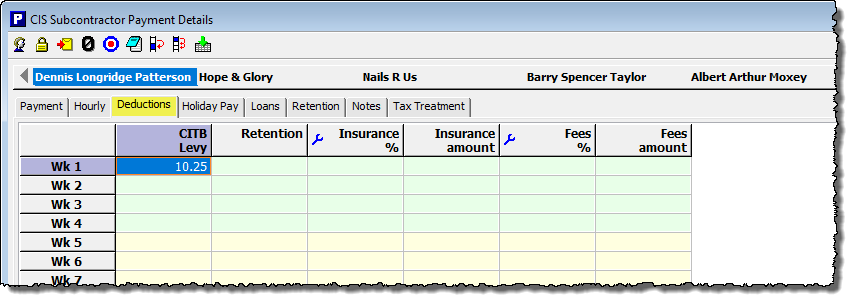
Deductions made from subcontractor payments, such as CITB Levy, Retentions, Insurance and Fees are recorded on this screen. Double-clicking in the ‘Retentions‘ column will take you to a further screen, where you can enter a percentage if you wish (Payroll Manager will then calculate the corresponding retention amount), or you can choose to enter the retention amount manually. The ‘Balance’ column displays the running balance of the retention, and the ‘Repayment‘ column allows you to record the amounts paid back to the subcontractor. The blue ‘spanner’ symbol allows you to enter any retentions bought forward from the previous year.
Two further sets of columns are labelled ‘Insurance‘ (% and amount) and ‘Fees‘ (% and amount). Both of these sets of columns are ‘customizable’ – i.e. by clicking on the blue ‘spanner’ symbol in the column heading it is possible to change the name of the column to something else.
Amounts entered in the ‘CITB levy‘ and ‘Retentions‘ columns reduce the amount subject to deduction and so reduce the calculated CIS deduction (if any) due to HMRC for that particular payment.
Amounts entered in the ‘Insurance‘ and ‘Fees‘ columns (or their ‘renamed’ equivalents’) do not reduce the amount subject to deduction, and so do not affect the calculated CIS deduction (if any) due to HMRC for that particular payment.
Holiday Pay:
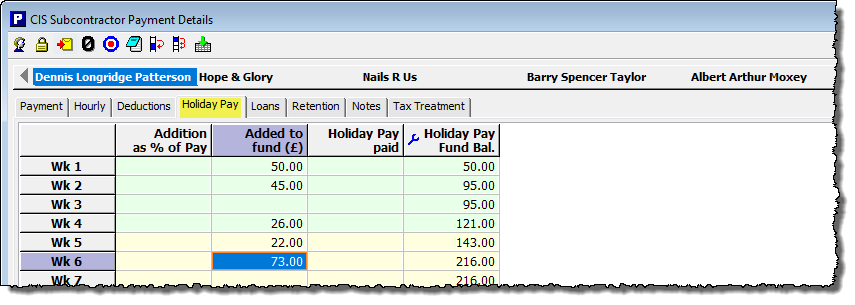
It is possible to operate a ‘Holiday Fund‘ scheme for subcontractors, where amounts are added to the fund (either as a specified percentage of the Basic Payment, or by manually entering a ‘Added to fund’ amount), and taken out of the fund as required. Payroll Manager keeps a record of the running Holiday Fund Balance.
Notes:
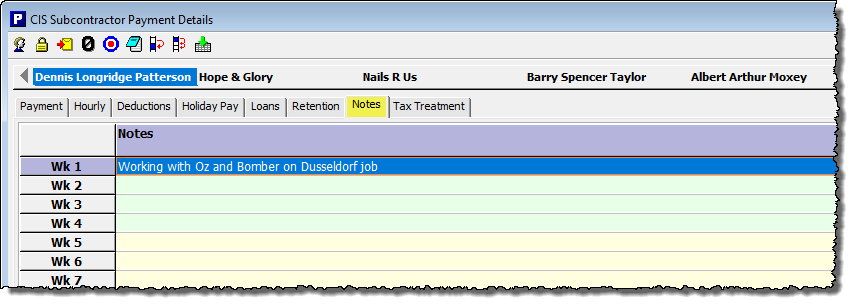
The ‘Notes‘ tab takes you to a ‘free format’ column where you can record any useful information about that particular payment. This information is not sent to HMRC.
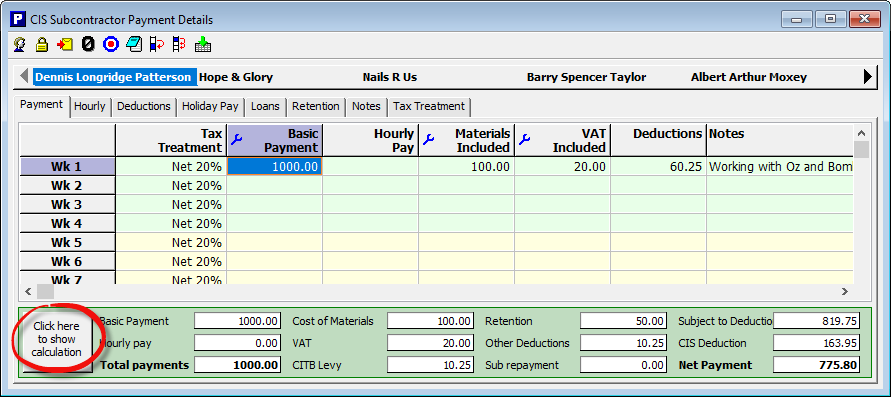
The ‘Click here to show Calculation’ feature:
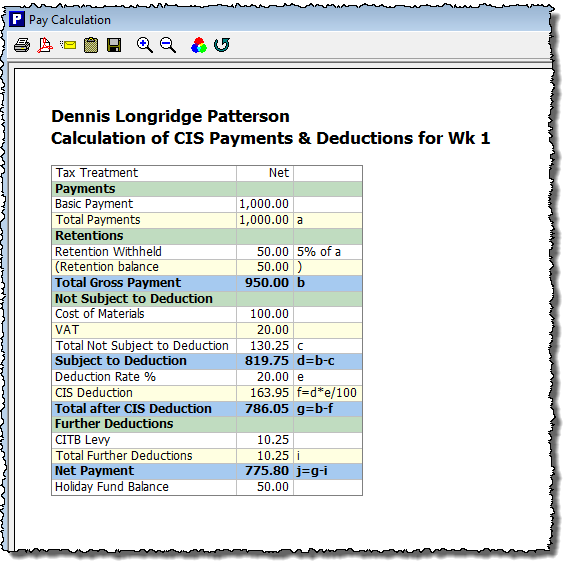
At the bottom-left hand side of the ‘CIS Payment Details’ screen is a button marked ‘Click here to show Calculation‘ (or similar). Clicking on this button will produce a report giving details of the calculated CIS Deduction and net payment amount for the selected subcontractor.
4. CIS Payment and Deduction Statement
A subcontractor that has had deductions taken from their payments must be issued with a ‘Payment and deduction statement‘ within 14 days of the end of each tax month. Click ‘CIS‘ then ‘Payment and Deduction Statement‘ from the main menu in Payroll Manager, and select the relevant subcontractor(s).
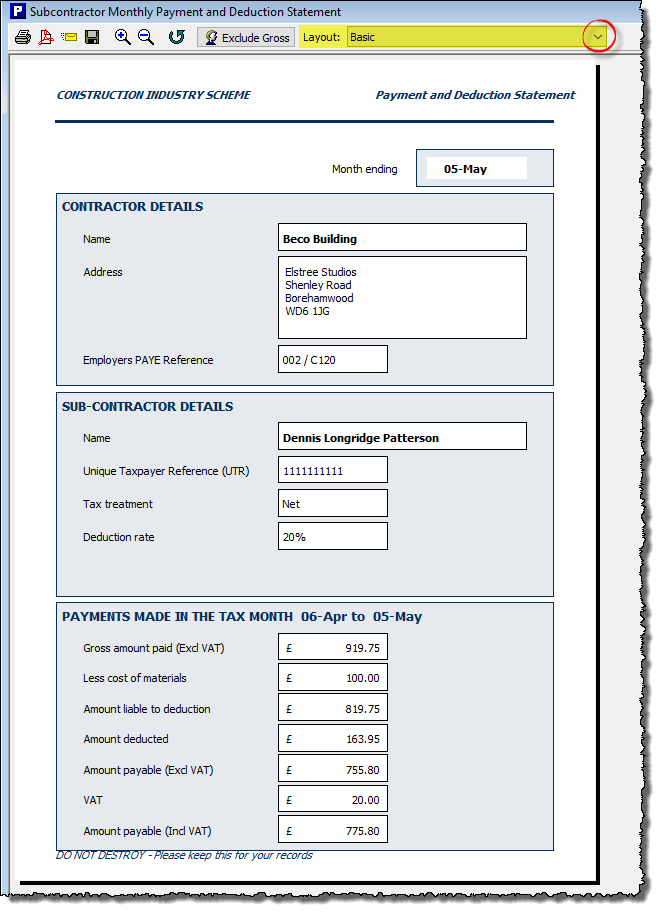
The ‘layout’ drop-down selector at the top of the report allows you to choose between the various available layouts. You can then choose to print / save as pdf or email a copy of the Payment and Deduction Statement to the subcontractor. (If you wish to send the report via email then please see our guide Sending payslips and reports via email using Payroll Manager ).
5. CIS300 Monthly Return
CIS300 monthly returns should be filed on or before the 19th of the following month (e.g. the CIS300 monthly return for April should be sent on or before 19th May).
Click ‘CIS‘ then ‘Monthly Return CIS300‘ from the main menu in Payroll Manager.
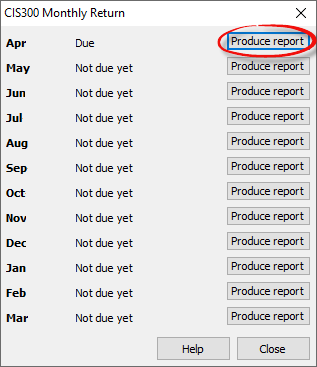
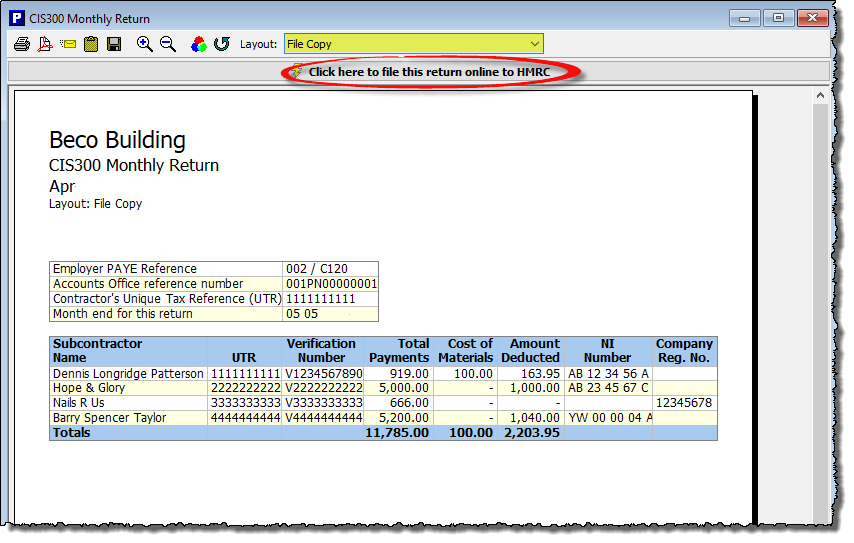
Click on the button marked ‘Produce report‘ for the appropriate month. The details of the CIS300 monthly return will be shown on a report. Choose the ‘File Copy’ layout to see a list of all subcontractors that are receiving payments in that month. Then click the button marked ‘Click here to file this return online to HMRC‘.
A box will appear asking you to confirm the status of the CIS subcontractors – tick the box marked ‘True‘, then click ‘Continue‘.

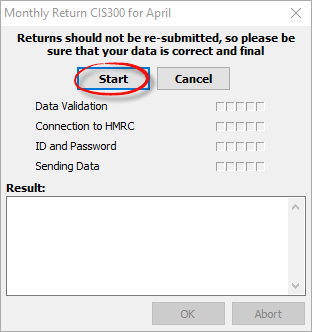
Click ‘Start‘ on the next screen to file the CIS300.
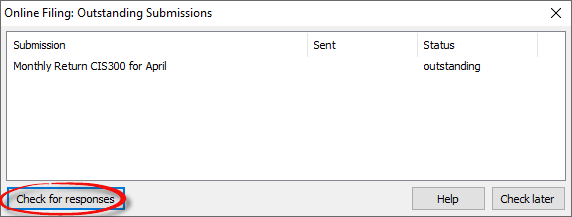
Click to ‘Check for Reponses‘ until you receive confirmation from HMRC that they have received the CIS300.
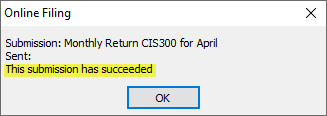
The confirmation message will be displayed as below.
Payroll Manager stores a record of each CIS300 submission in the ‘Tools – Online Filing – Submission Log’, should you need to view details of the submission at a later date.
FAQ
What should I do if I stop using subcontractors? – You should contact HMRC and then stop sending CIS 300 monthly returns – see What you must do as a Construction Industry Scheme (CIS) contractor: Tell HMRC about changes – GOV.UK for more details.
Links
Construction Industry Scheme: a guide for contractors and subcontractors (CIS 340) – GOV.UK
What you must do as a Construction Industry Scheme (CIS) contractor: Overview – GOV.UK (www.gov.uk)
Construction Industry Scheme: general enquiries – GOV.UK (www.gov.uk)


